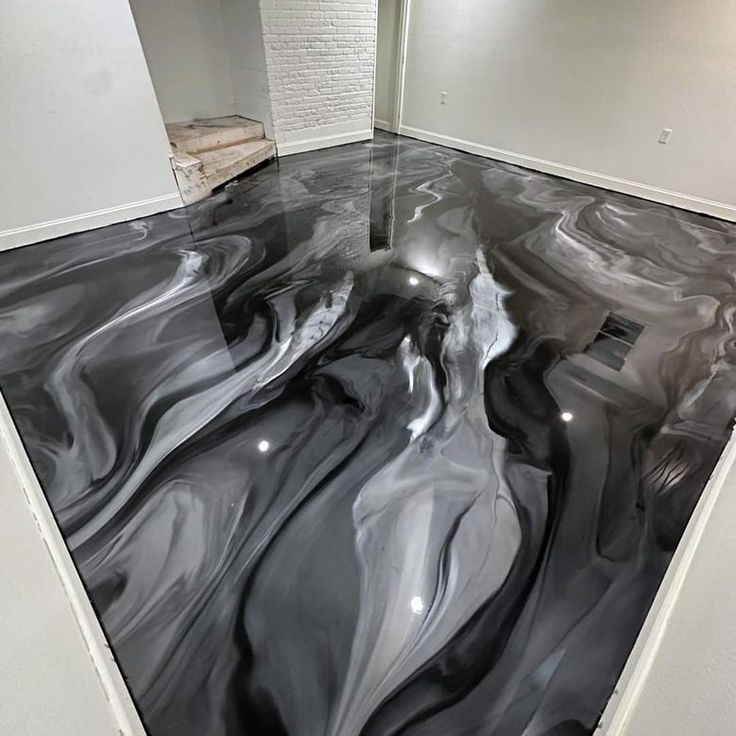
Why Grout Fails and Seamless Resin Does Not
Every tiled floor in Saudi Arabia shares a structural weakness: the grout. Concrete slabs expand measurably during the heat of the day and contract at night. In Riyadh, where surface temperatures can swing 20°C between morning and afternoon, this daily thermal movement is relentless. Rigid grout — a brittle, porous filler — cannot flex with this movement. It absorbs the stress and cracks. Within a few years, grouted floors begin showing hairline failures at joints. Within a decade, active crumbling, staining, and bacterial growth in the open joints becomes inevitable. Metallic epoxy flooring solves this at the source by eliminating grout entirely.
Metallic epoxy eliminates this failure point entirely. The floor is poured as a liquid resin mixed with suspended mica-oxide pigment particles. As it cures into a single monolithic sheet, there are no joints to crack, no seams to collect bacteria, and no grout to fail. The polymer is formulated with a controlled degree of elongation — meaning it can micro-flex by fractions of a millimeter as the concrete slab breathes beneath it.
The over-tile application method is the most significant practical advantage. The system is not applied to bare concrete — it is applied to your existing floor. After diamond grinding the tile glaze off to create a porous mechanical key, a specialist primer is applied that chemically anchors into the ceramic or porcelain. The metallic resin is then poured on top. The old floor is buried permanently beneath the new surface without demolition, skip hire, or the structural risk of chiseling concrete slabs.
3mm
Total System Build
No door trimming required on standard residential fits
100%
Seamless Coverage
Zero grout lines across the entire floor plan
Shore D 72
Cured Surface Hardness
Harder than standard residential floor tiles
7 Days
Full Chemical Cure
Maximum chemical and abrasion resistance at 7 days
Three Structural Reasons Grouted Floors Fail Where Resin Does Not
One Continuous Surface — No Threshold Strips Between Rooms
Without grout grid lines interrupting the visual plane, rooms connect seamlessly. Reflective metallic pigments bounce light further into the space, making it feel measurably larger.
Polymer Flex Under Daily Thermal Cycling
The polymer matrix tolerates the contraction and expansion of the concrete slab through 20°C+ daily swings without developing the stress fractures that crack rigid grout.
Applied Over the Existing Floor — No Demolition
No jack hammering, no skip hire, no structural damage risk. The metallic epoxy flooring system is mechanically bonded directly to your existing stable tile substrate.
Metallic Resin vs. Porcelain Tile: A Technical Comparison
| Feature | ★ Our StandardMetallic Epoxy Resin | Porcelain Tile |
|---|---|---|
Surface Continuity | 100% Seamless monolith | Fragmented by grout joints every 30–60cm |
Installation Method | Applied over existing floor — no demolition | Old floor must be demolished and removed first |
Thermal Stress Performance | Polymer flexes with slab movement | Rigid grout absorbs stress and fails |
Visual Depth | Three-dimensional light-reactive mica pigments | Flat printed ceramic surface pattern |
Bacterial Risk Zones | Zero — no joints or seams | Grout lines harbor mold, bacteria, and staining |
Maintenance Effort | Damp mop — single pass clean | Grout lines require scrubbing, re-sealing, and replacement |
The Over-Tile Metallic Epoxy Installation Process — Step by Step
Substrate Integrity and Moisture Assessment
Every tile on the floor is tap-tested using a hollow-sounding method. Any tile that produces a hollow tone is delaminating from the slab beneath and will cause the epoxy above it to eventually pop or crack. These tiles are removed and the resulting voids are filled with rapid-setting repair mortar and allowed to fully cure before proceeding. A calibrated moisture meter is then pressed to the floor in multiple locations. If the concrete vapor emission rate exceeds 3 lbs/1000 sq ft/24 hours, a moisture-mitigating primer must be substituted for the standard penetrating primer — a step that is frequently skipped by unqualified applicators and is the leading cause of epoxy bubbling and delamination.
Diamond Grinding to CSP 3 Profile
The tile's factory glaze is a hostile surface for epoxy bonding — it is designed to repel liquids. We remove it entirely using planetary diamond grinders fitted with PCD (polycrystalline diamond) segments. The goal is to achieve a Concrete Surface Profile (CSP) of 3, which creates a surface rough enough to see with the naked eye. The grinders are directly connected to industrial HEPA-filtered vacuums capturing particulates at source. Grout joints are also ground down to prevent the shallow depressions from telegraphing through the finished surface. The resulting floor looks matte and heavily scratched — this is correct.
Epoxy Primer Application and Penetration
A low-viscosity, 100% solids penetrating epoxy primer is rolled generously onto the prepared surface. This primer is thin enough to flow into and fill the microscopic pores opened by diamond grinding. It is left to partially gel — reaching a 'tacky' state that is critical. If the next coat is applied too early, the primer has not built sufficient mechanical strength. Too late and the window for inter-coat adhesion has closed and the layers will not chemically bond. On standard over-tile applications, the primer typically reaches optimal tackiness within 4 to 8 hours depending on ambient temperature.
Metallic Base Coat and Pigment Manipulation
The two-part metallic resin is measured by weight, combined, and power-mixed for a minimum of 3 minutes to fully activate the hardener. It is poured onto the floor in a continuous wet ribbon and spread with a serrated squeegee to a consistent depth. A spiked roller is then back-rolled over the surface to release any air micro-bubbles that would otherwise leave permanent pinholes in the cured surface. The artisan then uses a combination of torches, brushes, and directional airflow to manipulate the suspended mica particles into the desired flow pattern. The resin has a working window of approximately 45 minutes before it begins to gel.
Broadcast Anti-Slip and UV-Stable Topcoat
Once the metallic layer has hardened (minimum 24 hours), the surface is lightly abraded to remove any surface contaminants and provide an inter-coat key. An aliphatic polyurethane topcoat — UV-stable to prevent yellowing under artificial and natural light — is applied in two coats. The first coat, while still wet, receives a fine broadcast of 60-grit aluminum oxide if anti-slip is required. The second topcoat seals the aggregate in place, locking the grip texture permanently into the surface without the sharp sensation of loose grit.
System Technical Specifications
| Property | Value |
|---|---|
| Application Method | Over existing ceramic/porcelain tile (CSP 3 prep) |
| Total System Thickness | 2.5 – 3.0mm |
| Surface Hardness | Shore D 72–75 |
| Compressive Strength | 55 N/mm² |
| Tensile Adhesion to Substrate | > 1.8 N/mm² |
| Slip Resistance (Standard) | R10 (Dry and light wet conditions) |
| Slip Resistance (Modified) | R12 (Wet or anti-slip required) |
| VOC Content | < 10 g/L (post-cure: zero emission) |
| Thermal Service Range | -10°C to +60°C continuous |
Frequently Asked Technical Questions
The epoxy system itself will not crack if the substrate preparation is performed correctly and the tiles beneath are properly bonded to the slab. If a tile below the epoxy is hollow or delaminating, that tile can eventually fail, which creates a localized failure above it. This is why our mandatory first step is a 100% tap-test of every tile on the floor. Any hollow tile is removed and patched before the epoxy is applied. When this process is followed, the risk of substrate-induced cracking is eliminated.
The 3mm system is self-leveling but not infinitely forgiving. Minor lippage between adjacent tiles (up to 2mm) is typically absorbed into the system. However, significant height changes, deep grout joints, or damaged tile edges may telegraph through the finished surface if they are not filled flush during the preparation stage. During our site assessment, we identify all areas requiring pre-leveling work and include this in the scope.
The cured surface has a compressive strength exceeding most residential concrete. Furniture weight distributed over a broad base (sofa legs, cabinet bases) will cause absolutely no damage. Narrow concentrated points — specifically metal furniture legs without protective feet — can indent or scratch the polyurethane topcoat under sufficient downward pressure. We recommend fitting adhesive felt pads to any furniture piece with narrow or sharp-edged feet.
Yes, and it performs better than ceramic tile in this application. At 3mm total build thickness, the resin system conducts heat from underfloor elements faster and more efficiently than 10mm ceramic tiles laid on adhesive beds. The polymer composition also accommodates the gentle temperature cycling of in-slab heating (typically 28–35°C) without developing thermal stress cracks.
A standard single-floor residential installation takes 3 to 4 working days total. Day 1: preparation and priming. Day 2: metallic pour. Day 3: topcoat application. The floor can accept light foot traffic (socks only, no shoes) after 24 to 48 hours from the final topcoat. Full loading — furniture back in position, normal shoes, and heavy appliances — should wait 7 days for the resin to reach its maximum cross-link density.
Localized repairs are possible. Small scratches in the topcoat can be spot-sanded and re-sealed. Deeper damage penetrating the metallic layer requires careful matching of the original pigment mix, which is easier if the original installer retained the batch details. Full section repairs are structurally sound but may show a visible join depending on the original pattern complexity. For heavily patterned metallic floors, we recommend retaining a small quantity of the original metallic mix for future repair work.
The cured polyurethane topcoat is resistant to most household cleaners. For daily maintenance, a neutral pH mopping solution is ideal. Avoid bleach-based cleaners used repeatedly at full concentration — while a single application will not cause visible damage, regular undiluted bleach will gradually dull the surface gloss. Avoid anything containing abrasive grit (scouring powders). For stubborn marks, acetone or isopropyl alcohol applied to a cloth will dissolve most contaminants without damaging the topcoat.
Start With a Substrate Assessment
Every installation begins with a technical assessment of the existing floor. Contact us with your floor dimensions and tile type to begin.