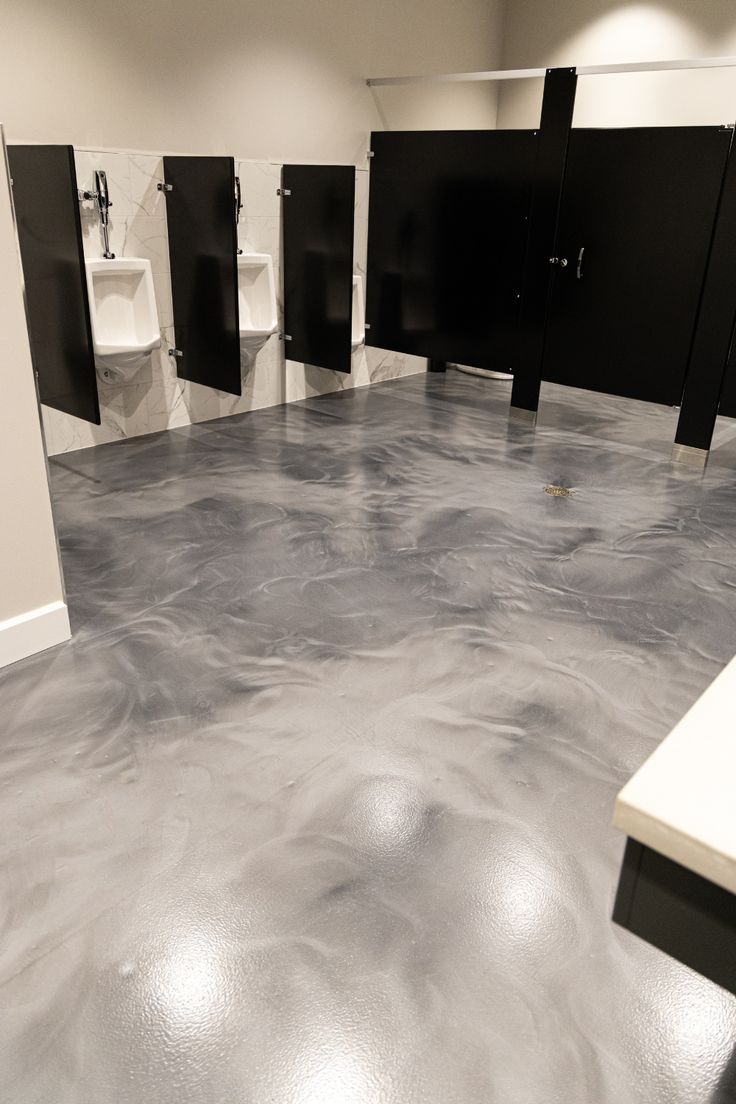
The Structural Reason Tiled Bathrooms Always Develop Mold
Metallic epoxy bathroom floors and shower systems solve grout mold at its root cause — not by cleaning the surface, but by removing the porous joint entirely. Black mold in bathroom grout is not a cleaning problem. It is a structural problem. Grout is a porous, cementitious filler. In a wet room environment — where condensation forms daily, where steam saturates the air, and where liquid water runs across the floor — grout absorbs moisture continuously. The interior of the grout joint becomes permanently damp. No amount of surface-level bleach cleaning can reach or kill the fungal colony growing inside the joint.
Metallic epoxy creates a monolithic wet room by eliminating every joint. The resin is poured as a liquid across the entire bathroom floor, flowing continuously from the dry zone around the vanity, down the sloped wet zone, and directly into the shower drain without a single seam or threshold strip. The result is a surface that has no microscopic channels for water to infiltrate and no porous material for mold to colonize.
However, applying a resin coating to a bathroom is significantly more technically complex than applying it to a living room floor. The single most critical requirement — which many unqualified installers skip — is the structural waterproofing layer beneath the resin. Epoxy itself is waterproof on its surface, but it is not a structural waterproofing membrane. If water finds a path around the edges of the floor, through wall penetrations, or up through the slab, it will eventually push the coating off from below. A correctly installed tanking membrane prevents this entirely.
Saudi Arabia's tap water supply — sourced primarily from desalination plants — is among the hardest in the world, with Total Dissolved Solids levels significantly above the WHO guideline for drinking water. This creates an accelerated limescale problem in Saudi bathrooms that homeowners in Europe or the United States rarely encounter at the same intensity. Calcium carbonate deposits from desalinated water build up on grout joints at a rate that makes standard Saudi bathroom maintenance extremely labour-intensive: the calcium chemically bonds with the calcium already in cement grout, forming permanent white mineral deposits that acidic cleaners cannot fully remove once established. On a sealed metallic epoxy surface, Saudi hard water cannot penetrate — calcium deposits sit on the polyurethane topcoat and wipe off completely with diluted white vinegar, leaving the surface as clean as the day it was installed.
0%
Water Absorption
Completely non-porous surface material
R12
Anti-Slip Rating
Highest barefoot wet zone safety classification
0
Grout Lines
Zero joints across the entire wet room
pH 3–12
Chemical Resistance
Survives bleach, shampoos, and hard water
Five Technical Requirements a Metallic Epoxy Bathroom System Fulfils
Tanking Membrane Below, Seamless Resin Above — Two Barriers, Not One
The polyurethane tanking membrane is the structural waterproofing barrier. The metallic epoxy above it is the hygienic, aesthetic surface. Both layers are required. Neither alone is sufficient.
Flows From Dry Zone Into Shower Without a Single Threshold
Liquid resin poured from the vanity area down into the shower tray and up onto the splash zone walls — continuous across all three surfaces without seam, threshold strip, or silicone joint.
R12 Grip in Soapy Water — Rounded Aggregate for Bare Feet
Rounded transparent quartz embedded in the final sealer provides R12 grip in wet soapy conditions. Safe for children and adults. Comfortable for bare feet unlike angular grit aggregate.
Mold Cannot Colonize a Surface With No Pores or Joints
Mold requires moisture, organic material, and a porous surface. A seamless resin bathroom eliminates the porous grout joint — removing the anchor point that makes bathroom mold permanent.
Hard Water and Limescale Sit On the Surface — Cannot Penetrate
Calcium carbonate deposits from hard Saudi water cannot bond to the cured topcoat. They are removed completely with diluted citric acid. No staining, no etching, no long-term damage.
Wet Room Resin Installation — The Full Engineering Sequence
Active Leak Detection and Drainage Assessment
Before any preparation begins, we flood-test the existing shower tray or wet area by temporarily blocking the drain and filling with 50mm of water. The area is left for 24 hours and the floor beneath the bathroom is inspected for seepage. If an active leak is present, the source must be identified and remediated before continuing. Applying any coating system over an actively leaking structure will result in eventual failure as water pressure forces its way through. Simultaneously, the drain gradient is checked using a digital level to confirm the floor slopes adequately toward the drain — typically a minimum of 1:80 gradient for wet rooms.
Existing Tile Removal or Mechanical Preparation
In wet rooms, we recommend full tile removal rather than the over-tile method used in dry areas. This is because old grout joints often contain residual moisture, and trapping that moisture beneath an impermeable coating can lead to osmotic blistering. Once tiles are removed, the concrete or screed beneath is inspected for structural integrity. Any soft, friable, or contaminated material is removed and replaced with fresh repair mortar. The substrate is then abraded to a rough, open profile using diamond grinding tools.
Structural Tanking Membrane Application
A liquid-applied, flexible polyurethane tanking membrane is applied to the floor and up the walls to a height of 300mm (the full splash zone). At all critical junctions — where the floor meets the wall, around the drain fitting, and around any pipe penetrations — a proprietary sealing tape is embedded into the wet membrane and folded to create a continuous, flexible waterproof detail. These corner joints are the highest-risk failure points in any wet room. The membrane is applied in two coats to a minimum dry film thickness of 1.5mm and allowed to cure fully (typically 48 hours) before the epoxy system is applied on top.
Epoxy Primer and Base Coat Application
A moisture-tolerant epoxy primer is applied over the cured tanking membrane. Because the membrane surface is slightly textured, the primer fills and consolidates it, providing a smooth, high-tack base for the metallic resin. The metallic flood coat is then poured and distributed. Special attention is paid to the sloped drain area to ensure the pigments flow and set naturally along the gradient without pooling unevenly.
R12 Anti-Slip Aliphatic Sealing
This is the most critical finish step for a bathroom application. A UV-stable, water-resistant aliphatic polyurethane topcoat is applied. While the first coat is still wet, rounded quartz aggregate (not sharp aluminum oxide, which would be too harsh for bare feet) is broadcast evenly across the surface. Once this coat cures, a second sealer coat is applied to encapsulate the aggregate, locking it permanently into the surface. The resulting texture provides excellent barefoot grip rated to R12 (Class C under DIN 51097 for barefoot areas) while remaining comfortable and easy to clean.
Wet Room System Technical Data
| Property | Value |
|---|---|
| Substrate Waterproofing | Liquid-applied polyurethane tanking membrane |
| Water Permeability of Finish | Class W3 — Impermeable |
| Slip Resistance Classification | R12 / Class C (Barefoot Areas) |
| Steam and Humidity Resistance | Continuous exposure — no degradation |
| Chemical Resistance | pH 3 to pH 12 |
| Drain Compatibility | All standard drain types — linear and point drains |
| Temperature Tolerance | Up to 60°C (continuous hot water exposure) |
Technical Questions on Bathroom Resin Systems
A bare, high-gloss epoxy floor without anti-slip treatment would be extremely dangerous in a shower. This is precisely why we never finish bathroom floors with a standard gloss topcoat. Every bathroom and wet room installation we complete includes an R12-rated anti-slip aggregate embedded into the final sealer. R12 is the highest classification under DIN 51130 — the same standard required for commercial kitchens and hospitals. It provides excellent grip under wet, soapy conditions while remaining comfortable and smooth enough for children's bare feet.
In most cases, we recommend full tile removal for wet rooms. Over-tile application is viable in dry areas but presents two risks in showers: old grout joints may contain moisture that causes osmotic blistering, and the grout joint profile can telegraph faint lines through the thin resin system. If budget or structural constraints require an over-tile approach, additional preparation steps and a heavier build are required, and the client must accept a slightly higher risk profile.
Steam rooms and hammams present extreme conditions — near 100% humidity, high temperatures, and prolonged condensation. The resin and tanking membrane system is technically capable of handling this environment, but the installation specification must be upgraded significantly. Additional membrane coats, specialized steam-resistant primers, and higher-build topcoat thicknesses are required. Not every resin product is suitable for steam room environments, and this must be communicated to us upfront so the correct material specification can be selected.
Hard water minerals — primarily calcium carbonate — cannot penetrate or bond to the non-porous polyurethane topcoat. They will deposit on the surface as limescale, but they can be removed completely with a diluted acidic cleaner (white vinegar or citric acid solution) and a soft cloth. The key is not allowing limescale to build up over months into a thick crystalline crust, which becomes mechanically abrasive when wiped off. Regular squeegee use after showering prevents buildup entirely.
Standing water on a correctly installed metallic epoxy floor will cause no damage. The surface is 100% non-porous and will not absorb water regardless of how long it sits on top. When the drain is unblocked and the water drains, the floor beneath will be completely unaffected. This is a core advantage over wood, carpet, and even some stone surfaces.
The timeline is driven by the tanking membrane cure, not just the epoxy cure. The membrane requires 48 hours to reach full waterproofing performance. The metallic resin requires 24 hours to become solid, and the topcoat requires a further 24 hours to cure. In total, the bathroom is typically out of service for 5 to 7 days from the day preparation begins. Light foot traffic through the bathroom (not the shower) is usually possible after 3 days. The shower itself must not be used for a minimum of 7 days after the final topcoat is applied.
Replace Your Grout Lines Permanently
Contact our wet room specialists to arrange a moisture assessment and discuss your bathroom dimensions.