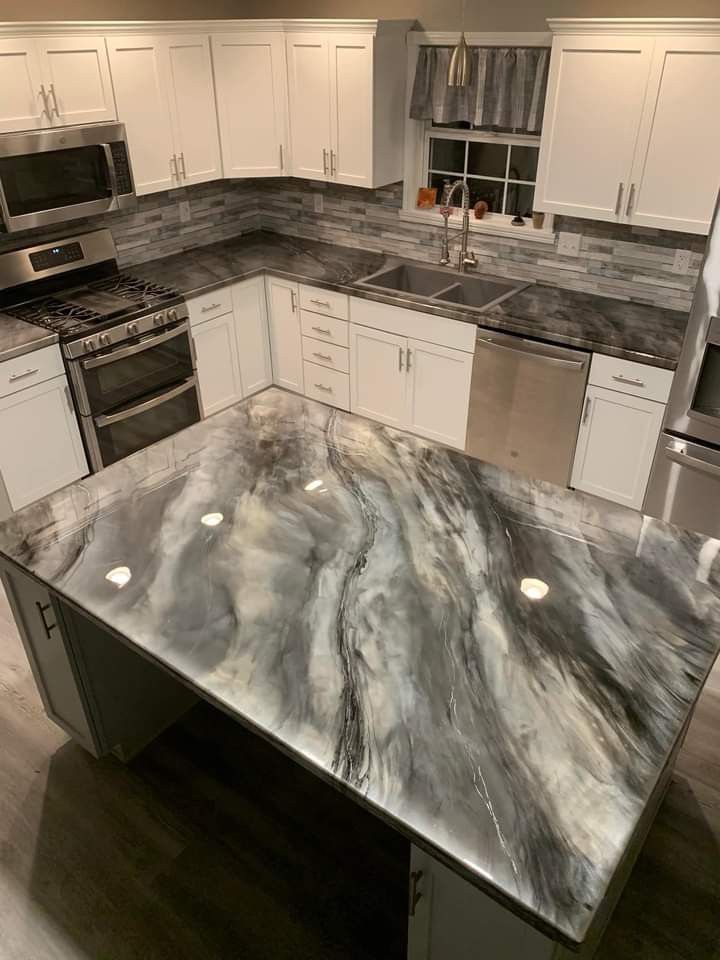
Replacing a Kitchen Worktop Without Touching the Sink
Metallic epoxy countertop overlays replace kitchen and bathroom worktops without disconnecting the sink or demolishing the existing surface. Standard kitchen countertop replacement requires removing the sink, disconnecting the plumbing, cutting away the old surface, and installing the new one before reconnecting everything. Even with a professional fabricator, this process takes several days.
The process is a pour-in-place overlay. Temporary edge formwork is attached around the perimeter of the existing countertop to contain the resin during pouring. The existing surface — whether laminate, MDF, tile, or damaged stone — is sanded to a bonding profile. A high-adhesion primer is applied. The metallic resin is then poured in a continuous flow that self-levels across the full worktop area, flows over the edges, and creates new profiles that the formwork shape determines. The sink is masked and remains in place. Disconnect nothing.
The most technically critical component of any kitchen countertop system is the final sealer. Worktops are exposed to a level of chemical aggression that floors rarely face: acidic lemon juice, red wine tannins, hot olive oil, bleach-based cleaning sprays, and the mechanical friction of daily cleaning. A standard floor topcoat is not adequate for this environment. We use food-grade aliphatic polyurethane systems that are specifically formulated for food preparation surface contact and are resistant to the chemical agents present in working kitchens.
Saudi Arabia's home kitchen presents specific conditions that make the worktop choice particularly important. The typical Saudi villa kitchen is large by international standards — 15 to 25 square metres is common — and is used intensively for daily cooking with generous quantities of acidic ingredients: lemon juice, tamarind, pomegranate, and vinegar-based marinades that are central to Saudi cuisine. Combined with the hard water from KSA's desalination-sourced mains supply, Saudi kitchen worktops accumulate limescale and cooking residue simultaneously. The grout lines of tiled worktops — common in older villa kitchens — trap both at once, creating a hygiene problem that surface cleaning cannot permanently resolve. A sealed metallic epoxy countertop with a food-grade aliphatic topcoat resists this combined acid and mineral aggression across a completely seamless, grout-free surface.
Five Reasons Kitchen Resin Surfaces Outperform Stone and Tile
No Grout Between Countertop and Upstand — Nowhere for Bacteria
No grout line between the worktop and the wall upstand. No join between sections of a large island. A single continuous surface from front edge to back wall.
Food-Safe After Full Cure — Certified Inert Topcoat
Once the aliphatic topcoat completes its 7-day chemical cure, it is completely inert — emitting zero VOCs and safe for incidental food contact on the prepared surface.
Resists Kitchen Acids, Oils, and Cleaning Chemicals
Formulated to resist staining and degradation from lemon juice, red wine, olive oil, and the diluted bleach and ammonia-based cleaners used in Saudi home kitchens.
Continuous Over Edges — Any Profile, No Visible Joints
Liquid resin wraps smoothly over the edge profile determined by the formwork. Square edges, bullnose curves, or waterfall drops are all achievable without a visible seam at the edge.
Sink Stays In Place — No Plumbing Disconnection
The metallic epoxy countertop overlay is poured around the existing sink. No disconnection, no skip hire for the old countertop, no weeks waiting for a fabricator.
Kitchen Chemical Resistance Test Results
Validated performance data for common kitchen substances.
| Test | Result |
|---|---|
| Citric Acid (Lemon Juice) — 24 Hour Exposure | No staining, no surface etching |
| Red Wine — 1 Hour Exposure, Wipe Clean | Complete removal — zero residual stain |
| Olive Oil — 24 Hour Pooled Exposure | No penetration — surface wipes clean |
| Diluted Bleach Cleaner (1:10) — Repeated Exposure | No color change or surface degradation |
| Hot Pan Base (180°C) — Direct Contact | Localized thermal damage — use trivets |
Kitchen Surface Comparison: Practical Perspective
| Feature | ★ Our StandardResin Overlay | Natural Marble | Quartz Composite |
|---|---|---|---|
Porosity and Stain Risk | Non-porous — zero absorption | High — requires sealing every 1–2 years | Low — non-porous |
Seams on Large Islands | Zero seams — unlimited continuous pour | Visible seams every 1.8–2.4m | Visible seams every 1.4–1.8m |
Resistance to Citric Acids | High — food-safe topcoat | Low — acid etches polish | High — engineered surface |
Installation Disruption | No demolition — poured over existing | Full removal and heavy lifting required | Full removal and heavy lifting required |
Custom Edge Profiles | Any profile achievable in formwork | Limited to stone fabrication cuts | Limited to factory edge options |
Countertop Overlay Installation — Complete Technical Process
Existing Surface Assessment and Structural Evaluation
The first determination is whether the existing countertop can bear additional weight and adhesion load. Solid MDF, chipboard, existing stone, and ceramic tile are all compatible substrates provided they are firmly attached to the cabinets beneath. Hollow sections in the existing worktop are located by tapping — any areas with significant flex or detachment must be re-secured with screws into the cabinet carcass before any resin work begins. The existing surface must be watertight at the sink cutout edges, as any water ingress under the overlay will eventually cause delamination.
Edge Formwork Construction
The edge profile of the finished countertop is determined by the formwork we attach temporarily to the underside of the existing worktop edges. For a standard straight edge, a thin strip of melamine-coated board is attached flush with the intended finished edge depth. For a waterfall edge, the formwork wraps vertically down the front. All formwork must be level, securely fixed, and sealed to prevent resin seeping behind it. The formwork remains in place until the resin has cured solid, then is removed to reveal the finished edge profile.
Surface Preparation — Sanding and Degreasing
The existing countertop surface is sanded aggressively with 40-grit abrasive to remove all factory sealers, gloss, and surface contaminants. Kitchen worktops accumulate a significant layer of oil, grease, and cleaning product residue over years of use — all of which must be dissolved with a solvent wipe before the primer is applied. Any failure to adequately degrease the substrate is the leading cause of adhesion failure in countertop overlay systems. The surface is then wiped again with a clean cloth to confirm zero contamination.
High-Adhesion Primer Application
A specialized countertop primer formulated for non-porous and difficult-to-bond surfaces (laminate, tile glaze, coated MDF) is applied by foam roller. This primer system typically involves a two-component adhesion promoter that bonds both to the existing surface chemistry and to the epoxy layers above it — providing the critical bridge between what is a hostile surface for adhesion (factory coatings) and the resin flood coat.
The Metallic Flood Pour
The two-part metallic epoxy is mixed and poured at the rear of the worktop surface. It self-levels forward under gravity, assisted by a spreading tool to ensure even distribution and coverage at the edges. The installer manipulates the metallic pigments using brushes and gentle airflow to create the desired pattern. As the resin approaches the front edge, it flows over the formwork and coats the edge profile simultaneously. The working window is approximately 30–40 minutes at kitchen temperatures.
Food-Grade Topcoat Application
After the metallic layer has cured to a hard surface (minimum 24 hours), a food-grade aliphatic polyurethane topcoat is applied in two coats. This specific topcoat chemistry is selected for its combination of chemical resistance to kitchen substances, its compliance with food contact surface standards, and its ability to resist the daily friction of kitchen cleaning routines. The countertop must not be used for 7 days after the final topcoat application to allow full cross-link cure.
Technical Questions on Resin Countertop Overlays
Once fully cured (7 days), the aliphatic topcoat is completely inert and safe for incidental food contact. It does not emit any VOCs or chemical components at room temperature after full cure. However, we recommend always using a chopping board — not because of chemical safety, but because repeated direct knife contact will eventually scratch the topcoat surface, reducing its aesthetic quality.
No. While the topcoat resists heat from warm plates and ambient kitchen temperatures (up to approximately 80°C for brief contact), direct placement of a pot or pan just removed from an open flame or induction hob can reach 180–220°C. At these temperatures, any resin surface — including quartz composite in some cases — will show localized thermal marking or delamination. Always use a trivet or pot stand. This is the same instruction we give for marble and granite countertops.
Swollen and delaminating laminate edges indicate moisture penetration in the MDF substrate beneath. Applying resin over a substrate with active moisture damage or structural weakness will result in adhesion failure. These areas must be cut out, the MDF replaced with new board, and allowed to dry completely before the system is applied. Minor surface chips that do not compromise the structural integrity of the worktop can be filled with repair compounds as part of the preparation stage.
Yes — the sink does not need to be disconnected. It is masked with tape and plastic sheeting to prevent contamination from sanding dust and resin drips. The resin is poured and worked up to the edge of the sink opening and allowed to cure. The masking is removed after the topcoat cures, revealing a clean, tight line between the resin surface and the sink body.
The total build of the system, including primer, flood coat, and topcoat, is typically 3 to 4mm. This is sufficient to require no significant adjustments to appliance heights or drawer clearances in most standard kitchen configurations. If you have countertop appliances with very tight clearances to the underside of wall cabinets, we recommend confirming the clearance measurement before proceeding.
Upgrade Your Kitchen Without Demolition
Send us your countertop dimensions and current substrate type to begin the assessment process.